Perfect Chicken Brine: Master Salt Ratios for Tender, Moist Results
Ever experienced the disappointment of serving a perfectly roasted chicken, only to find it dry, tough, and bland on the inside? It’s a common culinary heartbreak that can deflate even the most enthusiastic home cook. You spend time and effort, envisioning a succulent, flavorful centerpiece, but end up with a dish that just doesn’t live up to expectations. The good news? You're not alone, and there's a remarkably simple, incredibly effective secret that professional chefs and seasoned home cooks swear by: brining. Mastering the perfect chicken brine recipe, particularly understanding the crucial role of salt ratios, is the key to unlocking consistently tender, juicy, and deeply seasoned poultry, every single time. Forget dry chicken; your journey to culinary success starts here.
Why Brine Chicken? The Science Behind Juicy Meat
Brining is far more than just soaking chicken in saltwater; it's a clever application of food science that guarantees superior results. At its core, brining leverages osmosis and the unique properties of salt to transform the texture and flavor of your poultry.
When chicken is submerged in a salt solution, a fascinating process begins. The salt molecules, being smaller, penetrate the muscle fibers. This salt alters the protein structure, causing the muscle cells to unravel slightly. This unwound structure then becomes less prone to tightening and expelling water during the cooking process. Think of it like tiny sponges within the meat that are now much better at holding onto moisture. Additionally, the salt solution itself is absorbed into the meat, effectively "seasoning" it from the inside out. This dual action means your chicken not only stays incredibly moist, even lean cuts like chicken breasts, but also boasts a robust flavor that goes far beyond the surface.
There are two primary methods of brining: wet brining, which involves submerging the poultry in a saltwater solution, and dry brining, where salt is applied directly to the surface of the meat. While both offer distinct advantages, this guide centers on the transformative power of a wet
essential wet brine recipe guide, providing a clear, precise path to poultry perfection.
Crafting the Perfect Chicken Brine Recipe: Master Salt Ratios
The heart of any successful chicken brine recipe lies in its salt concentration. Too little salt, and you won't get the desired tenderizing and moisture-retention effects. Too much, and your chicken will be unpleasantly salty. The "sweet spot" for a basic wet chicken brine is a **5–6% salt solution**. This means for every liter of water, you’ll use 50–60 grams of salt.
Here’s your foundational chicken brine recipe:
*
Water: 1 liter (approximately 4 cups)
*
Kosher Salt: 50–60 grams (about 3–4 tablespoons Diamond Crystal Kosher Salt or 2.5–3 tablespoons Morton Kosher Salt).
It’s crucial to note that different brands of Kosher salt have different densities. Measuring by weight provides the most accurate and consistent results.
*
Sugar (Optional): 15–25 grams (1–2 tablespoons). While not essential for the brining process itself, sugar helps balance the savoriness, promotes better browning on the skin, and can add a subtle sweetness.
*
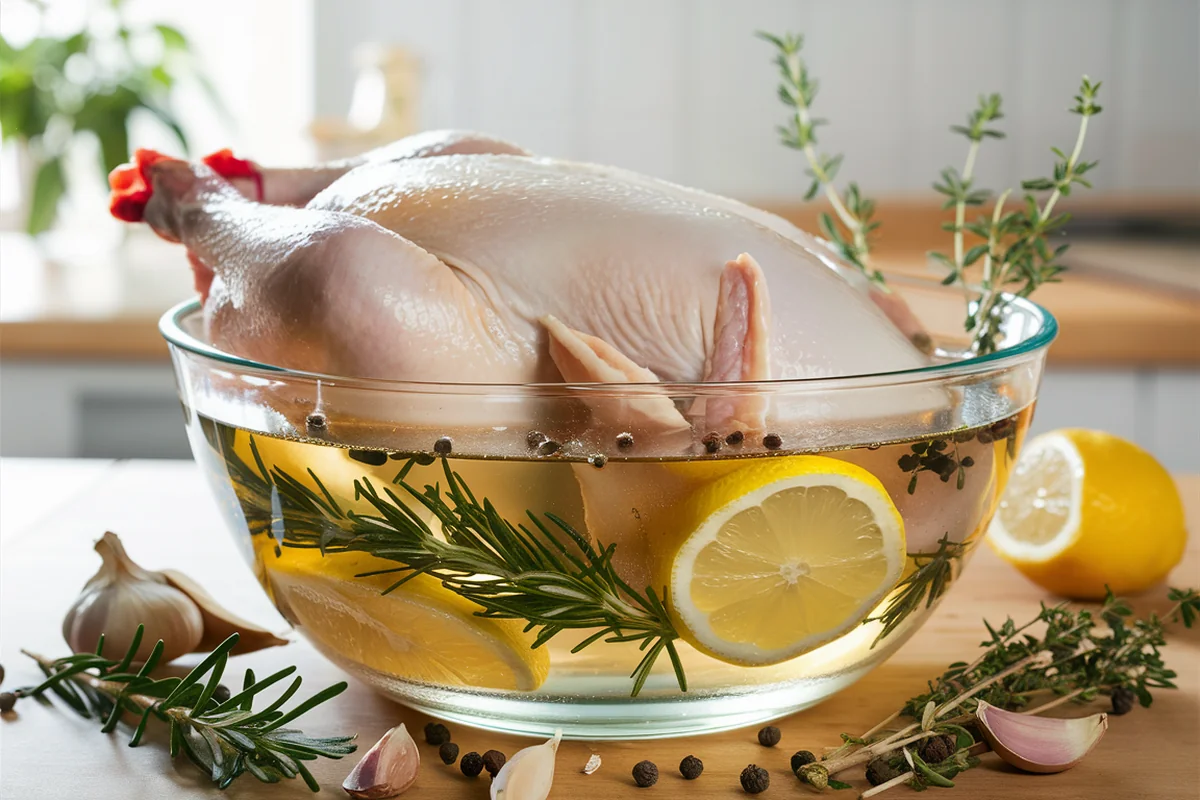
Aromatics (Optional): To infuse deeper flavor, consider adding:
* 2-3 bay leaves
* 6-8 black peppercorns
* 2 smashed garlic cloves
* Strips of citrus peel (lemon, orange)
* A few sprigs of fresh herbs (rosemary, thyme, sage)
Important Ratio Notes: The 5–6% salt ratio is your golden rule. To scale the recipe up or down, simply maintain this percentage. For example, if you need 2 liters of water, you’d use 100–120 grams of salt. If using common table salt, which is much denser and saltier by volume, start at the lower end of the recommended salt range (5% or even slightly less) and consider tasting a diluted portion of your brine to ensure it's not overly saline before adding your chicken.
Optimal Brining Times for Every Chicken Cut
The ideal brining time depends on two main factors: the salt concentration of your brine and the size/cut of your chicken. Generally, a shorter soak pairs well with a 6% brine, while a longer soak is better suited for a 5% brine.
Here’s a guide to help you achieve perfectly brined poultry for various cuts:
*
Whole Chicken (1.3–2 kg / 3–4.5 lbs): Use a 5% brine for 8–12 hours. This longer soak ensures the brine penetrates evenly throughout the entire bird.
*
Spatchcocked Whole Chicken: For a butterflied bird, opt for a 5–6% brine for 6–10 hours. The flatter profile allows for quicker penetration.
*
Bone-in Thighs or Leg Quarters: A 5–6% brine for 3–6 hours is ideal.
*
Drumsticks: These smaller cuts benefit from a 5–6% brine for 2–4 hours.
*
Boneless Breasts: Being lean and relatively thin, boneless breasts need a shorter soak. Use a 5–6% solution for 1–2 hours. Be careful not to over-brine, as they can become too salty or develop a rubbery texture.
*
Wings: These require a relatively quick soak in a 6% brine for 1–2 hours.
For more in-depth guidance on specific cuts and how to adjust your approach for truly exceptional results, be sure to check out our detailed guide on
Brine Any Chicken Cut: Optimal Times & Ratios for Juicy Meat.
Step-by-Step Brining Success: From Mix to Marvelous
Achieving the perfect chicken doesn't just stop at the ratios; the execution of your chicken brine recipe matters. Follow these steps for consistent success:
1.
Dissolve the Salt (and Sugar): Begin by warming a small portion (e.g., 1-2 cups) of your total water. Stir in the salt and optional sugar until fully dissolved. This ensures no undissolved salt crystals are left, which could lead to uneven seasoning. Once dissolved, add the remaining cold water (and ice, if using) to bring the temperature down.
2.
Chill the Brine Fully: This step is non-negotiable for food safety. The brine *must* be refrigerator-cold before you introduce any raw chicken. Adding a couple of handfuls of ice can speed up the chilling process. Never submerge raw poultry in lukewarm brine, as this creates a perfect breeding ground for bacteria.
3.
Submerge the Chicken: Place your chicken in a non-reactive container (glass, food-grade plastic, or stainless steel are excellent choices). Pour the chilled brine over the chicken, ensuring it is completely submerged. If the chicken floats, use a small plate or a food-safe weight to keep it under the liquid. Cover the container and transfer it to the refrigerator for the recommended brining time.
4.
Rinse (Optional) and Dry: After brining, remove the chicken from the solution. If you used a 6% brine or brined for a longer duration, you might choose to quickly rinse the chicken under cold running water to remove any excess surface salt. However, if your ratios and timing were precise, this step is often unnecessary. Regardless, pat the chicken *very dry* with paper towels. Dry skin is absolutely essential for achieving that coveted crispy, golden-brown exterior when cooked.
5.
Rest Uncovered (Optional but Recommended): For even crispier skin and more even cooking, consider placing the patted-dry chicken back in the refrigerator, uncovered, for an hour or two (or even overnight). This allows the skin to air-dry further, intensifying its crisping potential.
Beyond the Basics: Flavor Enhancements & Advanced Tips
While a simple salt and water brine is incredibly effective, don't hesitate to experiment with aromatics to elevate your chicken's flavor profile. Beyond bay leaves and peppercorns, consider:
*
Herbs: Fresh rosemary, thyme, sage, or even a bundle of parsley stems.
*
Spices: Juniper berries, whole cloves, star anise, coriander seeds, or a pinch of red pepper flakes for a subtle kick.
*
Citrus: Slices of lemon, orange, or lime can add a bright, zesty note.
*
Alliums: Quartered onions or leeks, along with smashed garlic cloves, provide a foundational savory depth.
For those curious about alternative methods, a quick mention of dry brining: it involves rubbing the chicken directly with salt (and optional seasonings) and letting it rest in the refrigerator. This "no-bucket" method also yields fantastic results, often leading to even crispier skin, as it draws moisture out of the skin before reabsorbing salt and some moisture into the meat. It's a great option if you're short on fridge space for a large brining container.
Conclusion
Brining chicken, at its heart, is a straightforward yet profoundly impactful technique. By understanding and meticulously applying the 5–6% salt ratio, you gain precise control over your poultry's texture and taste. This isn't just about preventing dry chicken; it's about consistently creating tender, remarkably moist, and deeply seasoned meals that will impress everyone at your table. Embrace this essential chicken brine recipe, follow the simple steps, and prepare to transform your cooking. Say goodbye to culinary disappointment and hello to juicy, flavorful chicken perfection!