Brine Any Chicken Cut: Optimal Times & Ratios for Juicy Meat
Have you ever lovingly prepared a chicken dish, only to be met with dry, uninspiring meat? It’s a common culinary frustration, a disappointment that can sour even the most promising meal. The good news? Achieving consistently moist, deeply seasoned chicken, regardless of the cut, is not a secret reserved for professional chefs. It’s a straightforward technique called brining, and mastering the right
salt ratios for tender, moist results, alongside optimal timing, will transform your poultry cooking forever. This comprehensive guide will walk you through the precise steps for a flawless
chicken brine recipe, ensuring every bite is a revelation of flavor and succulence.
Why Brining is Your Secret Weapon for Juicy Chicken
At its heart, brining is a simple yet powerful method to infuse chicken with moisture and seasoning from the inside out. Unlike a mere marinade that primarily flavors the surface, a wet brine works on a deeper, cellular level. Here's how it works its magic:
*
The Science of Succulence: When chicken is submerged in a salt solution, a process called osmosis occurs. The salt molecules penetrate the muscle fibers, causing them to denature (uncoil). As the proteins unwind, they create microscopic gaps that allow water to be absorbed and trapped within the meat. When the chicken cooks, these modified proteins coagulate differently, holding onto that added moisture more effectively, leading to significantly juicier results.
*
Deep Seasoning: Beyond just moisture, the brine solution carries flavor into the meat. This means your chicken isn't just seasoned on the surface; every single bite offers a consistent, savory taste. This is why even lean cuts like boneless, skinless chicken breasts, which are notoriously prone to drying out, emerge incredibly moist and flavorful after a short soak.
*
Tender Texture: The salt solution also works to break down some of the muscle proteins, which contributes to a more tender texture. This is particularly noticeable in tougher cuts, making them more enjoyable to eat.
While there are two main methods – wet brining (the focus of this guide) and dry brining (salting the chicken directly) – both aim to leverage salt's ability to enhance moisture and flavor. For consistency and a deeply infused result across all chicken cuts, a well-executed wet
chicken brine recipe is often the most reliable choice for home cooks.
Crafting the Perfect Chicken Brine Recipe: Ratios and Ingredients
The foundation of any successful brine is a precise salt-to-water ratio. Too little salt, and it won't be effective; too much, and your chicken will be overly salty or even develop a mushy texture. Chef Thomas Keller, among other culinary masters, champions the transformative power of brining, underscoring the importance of these foundational ratios.
The Core Ratio: Salt and Water
The sweet spot for a chicken brine is typically a
5–6% salt solution. This translates to 50–60 grams of salt per 1 liter of water (or 1000 grams of water).
*
By Weight (for Accuracy):
* For 1 liter (about 4 cups) of water: 50–60 grams of Kosher salt.
* *Tip:* Always weigh your salt for the most accurate results. Salt density varies significantly between types. For example, Diamond Crystal Kosher salt is lighter and flakier, so 3–4 tablespoons typically equate to 50–60 grams. Morton Kosher salt is denser, so 2.5–3 tablespoons will achieve the same weight. If using standard table salt, which is much denser and tastes saltier, start at the lower end (around 40-45g per liter) and proceed with caution.
*
Scaling the Recipe: This basic formula scales easily. If you need more brine, simply maintain the 5–6% salt-to-water ratio. For instance, for 2 liters of water, use 100–120 grams of salt.
Optional Enhancements for Flavor
While salt and water are the essentials, adding a few extra ingredients can elevate your brine, contributing to a more complex and balanced flavor profile.
*
Sugar (Optional, but Recommended): Adding 15–25 grams (1–2 tablespoons) of sugar per liter of water helps balance the savoriness of the salt, adds a subtle sweetness, and aids in achieving beautiful caramelization and browning on the chicken skin during cooking.
*
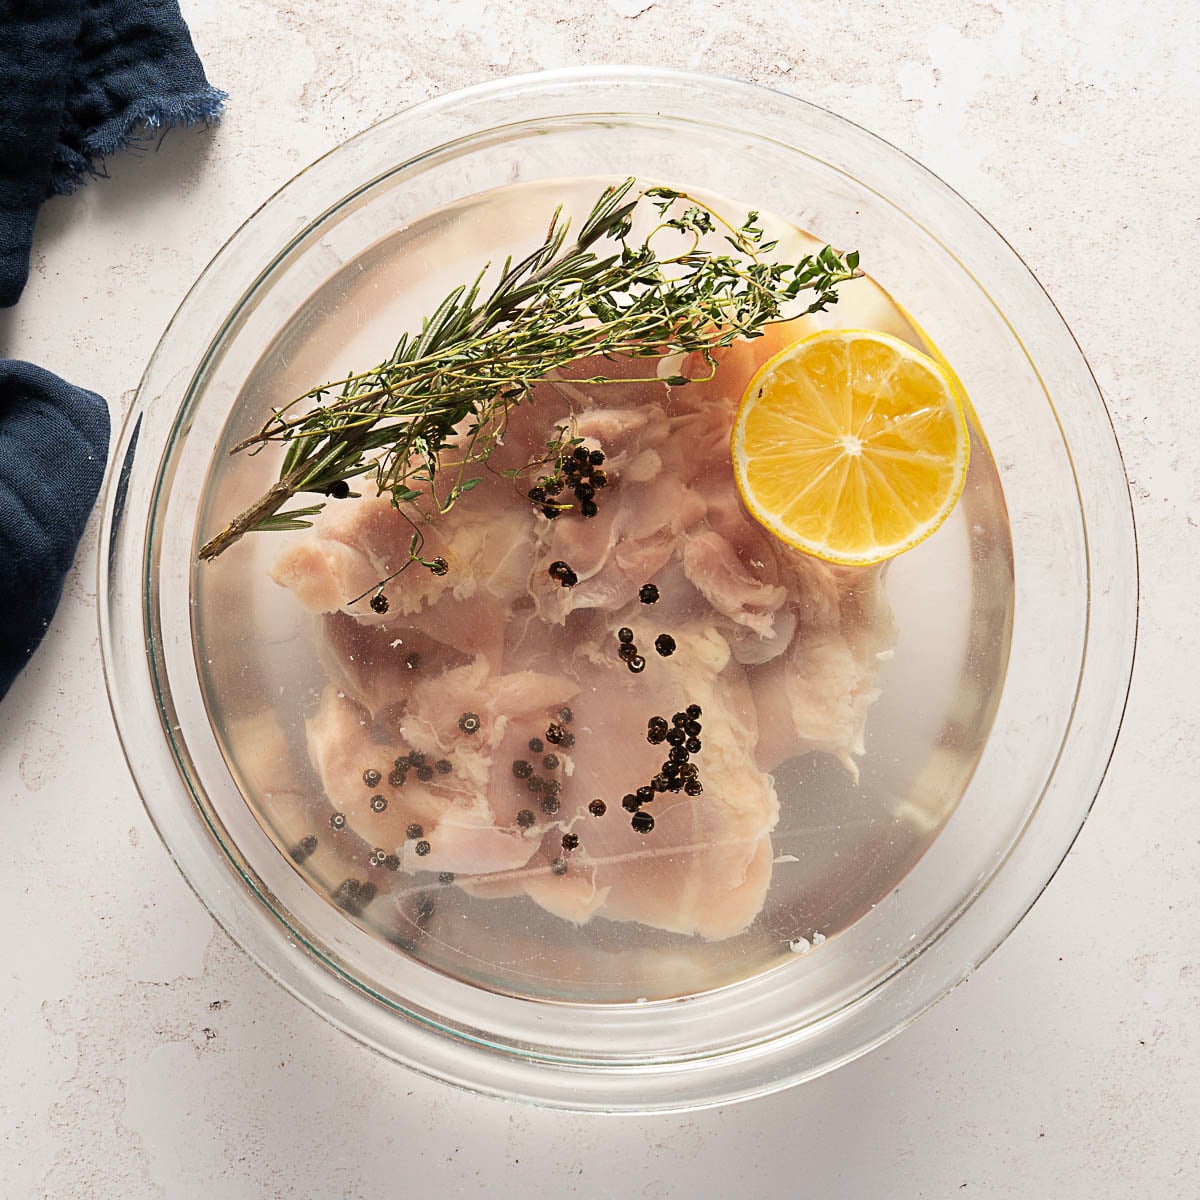
Aromatics (Optional, for Customization): This is where you can truly personalize your
chicken brine recipe. Common additions include:
* 2–3 bay leaves
* 6–8 whole peppercorns
* 2 smashed garlic cloves
* Peel from half a lemon or orange (avoid the bitter white pith)
* A few sprigs of fresh herbs like rosemary, thyme, or sage.
* *Flavor Combinations:* For a classic roast chicken, use bay, peppercorns, and thyme. For a Mediterranean twist, add lemon peel, oregano, and garlic. For a slightly Asian-inspired chicken, consider ginger slices and star anise. The possibilities are endless, making this a truly versatile
essential wet brine recipe guide.
Optimal Brining Times for Every Chicken Cut
The ideal brining duration is crucial; it varies significantly based on the size, thickness, and bone content of your chicken cut. Too short, and the brine won't fully penetrate. Too long, and the meat can become overly salty or even mushy due to excessive protein denaturation.
Here’s a breakdown of recommended brining times and salt percentages for common chicken cuts:
*
Whole Chicken (1.3–2 kg / 3–4.5 lbs): Use a 5% brine for 8–12 hours. The larger mass requires more time for the brine to reach the center.
*
Spatchcock Whole Chicken: A flattened chicken allows for faster penetration. Opt for a 5–6% brine for 6–10 hours.
*
Bone-in Thighs or Leg Quarters: These thicker, bone-in cuts benefit from a 5–6% brine for 3–6 hours. The bone insulates the meat, requiring slightly longer.
*
Drumsticks: Similar to thighs, but slightly smaller. Use a 5–6% brine for 2–4 hours.
*
Boneless Breasts: Being lean and relatively thin, boneless breasts brine quickly. Use a 5–6% solution for a shorter 1–2 hours. Be careful not to over-brine, as they can become too salty or develop a cured texture.
*
Wings: These smaller pieces are best with a slightly stronger brine for a shorter duration. Use a 6% brine for 1–2 hours.
* *General Rule of Thumb:* For a shorter brining time, you can opt for the higher (6%) salt concentration. For longer brining, stick to the lower (5%) concentration to prevent over-salting. Always use your specific cut and the recommended times as your guide to achieving the perfect, tender chicken.
Your Step-by-Step Guide to a Flawless Brine
Following these simple steps will ensure your
chicken brine recipe is effective and safe.
1.
Dissolve the Salt and Sugar: In a large, non-reactive container (glass, plastic, or stainless steel), warm about 1 cup of the total water. Stir in the salt and any optional sugar until completely dissolved. This ensures uniform distribution.
2.
Chill the Brine Fully: Add the remaining water to the container, making sure it’s ice-cold. You can even add a couple of handfuls of ice cubes directly into the solution. The goal is to bring the brine’s temperature down to refrigerator levels (below 40°F / 4°C) before adding the chicken. *Crucial Tip:* Never put raw chicken into a lukewarm brine, as this creates a breeding ground for bacteria.
3.
Submerge the Chicken: Once the brine is thoroughly chilled, gently place your chicken cuts into the solution. Ensure they are fully submerged. If the chicken floats, use a small plate or a resealable bag filled with water to weigh it down. Cover the container and transfer it to the refrigerator for the recommended brining time for your specific cut.
4.
Rinse (Optional) and Pat Dry: After brining, remove the chicken from the solution. If you used a 6% brine or brined for the maximum time, a quick rinse under cold running water can help remove any excess surface salt. However, for a 5% brine or shorter brining times, rinsing isn't always necessary. Regardless, it is absolutely essential to pat the chicken very, very dry with paper towels. Dry skin is the key to achieving that coveted crispy, golden-brown exterior when you cook.
5.
Rest Uncovered (Optional but Highly Recommended): For an extra crispy skin, place the brined and patted-dry chicken on a wire rack set over a baking sheet, uncovered, in the refrigerator for 1-4 hours before cooking. This air-drying process further removes surface moisture, optimizing it for browning.
* *Important Note:* Always discard used brine. Never reuse it, as it will have come into contact with raw poultry.
By embracing the simple yet profound technique of brining, you unlock a world of culinary possibilities, guaranteeing juicy, flavorful chicken every single time. From tender breasts to succulent thighs, a well-executed
chicken brine recipe is your assurance against dry, disappointing poultry, elevating your home cooking to restaurant-quality standards.